Firstly I don't do anything very special and I'm certainly no expert. Sometimes it's very difficult to get good shots and particularly if the card is made with certain colours predominant such as lilac, yellow and red. Sometimes when photographing a difficult colour I'll do it under a lamp even if the daylight is good as I get a better result. I don't have any special equipment such as a light box or any extra lights and have a standard, mid range, automatic digital camera which cost about £70. I set the camera on automatic mode on the dial on top of the camera. There are lots of other settings on this dial such as video, scene etc. I'm sure I need to experiment more with the other settings.
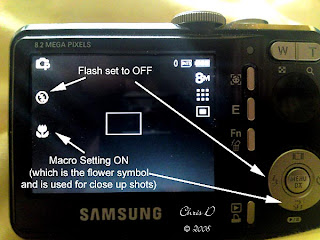 This picture
shows the
settings I use
on my camera for every
photograph I take of my cards
day or night bearing in mind that the dial on the top of the camera is set to automatic.
I'm sure that different equipment will have different settings but I think that the flash settings and macro function are usually easy to find on the main camera buttons or in the camera menu and most digital cameras have macro.
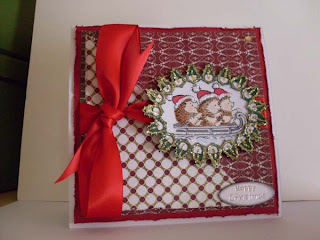
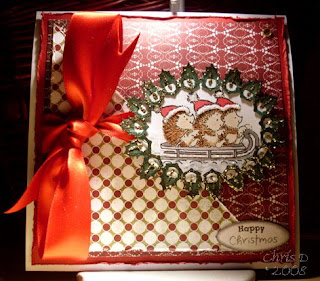
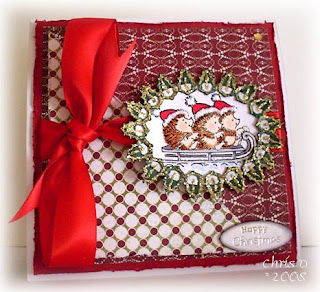 These two photographs show before and after editing. In the day time I find somewhere to take the picture where there is indirect light to cut down on glare (although I don't always manage it). Camera settings are as above. I put white paper behind and below the card which helps to bring out the colours and will try and angle the card to try and pick up sparkly areas. This doesn't always work. In order to pick up sparkle you need two lights set at different angles I'm told.
I use photoshop for editing and everyone will have different editing software but I believe that most have editing filters. Firstly I crop out the space around the card but always leave a good border as it's easier on the eye not to have the card taking up the whole area, a little space around the card is good. I then adjust the levels, as I have a full version of photoshop I do this manually but there is also an automatic levels function in most editing programs which does it all for you. This filter corrects brightness. Next filter is Contrast and again there are manual and automatic filters. This is the filter that gives definition to the photograph giving a less flat and more three dimensional result. Lastly the colour filter and again automatic and manual depending on the program used and this can also be used. I probably wouldn't use this as my camera seems to take fairly good to original colour photographs and the filter can change a lot of things that you don't want to change, but you can try it and take it off if you don't like the effect it gives. One extra thing that I do on daylight pictures is to add a feathered white border. The last thing I do is to sharpen and again I'm not sure about software other than photoshop but I'm sure most have a sharpening function. I don't always sharpen the picture, sometimes it can be perfectly ok without it, and I only ever sharpen very slightly, too much and the picture becomes grainy.
The most important thing of all is your original photograph. You can't make a bad photograph look that great. If you start off with a fairly good photo by placing it in good indirect light and playing with the settings on your camera, then it shouldn't need much in the way of correcting. There are some days that I just don't get good photographs!
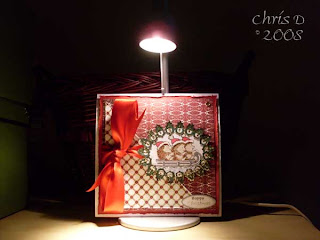
Photographing at night or in very bad light is the same as most of the above except that I place my card directly under a lamp. Sometimes under a small desk lamp which creates a more moody and shadowy effect and sometimes under a daylight bulb. Everything else I do the same as above. Here are a couple of photos the first one to show the set up when I take a photo under the desk lamp and the second one the photo taken closer and after editing. On the after shot there is some glare at the top of the card and I could have angled it better but I don't mind it. I hope this helps and if you made it to the bottom of this post I like you very much! At the end of the day I'm no expert but this is what I do with my pictures and mostly they come out ok. Back soon, Chris

13 comments:
Thanks Chris that was extremely helpful, I always use macro and zoom in but not to great effect, your images look far nicer than mine. I am going to try as you suggest and hope you will notice better results from me!
Belinda x
Another beauty Chris. Great tips for taking photos, I greatly need those! Hugs, Lainy xx
Yay chris, I made it to the end of your post lol! I was riveted whilst reading your post and I will definitely try out some of your hints and tips, It must have taken you ages to put this post together and I am extremely grateful that you did :) Thanks a million, gazillion times :) Donna x
Chris, as you know I always love the cards you make, they are beautiful. Thank you also for inspiring me and giving me helpful tips. Pop over to my blog, there is a well deserved award waiting for you.
Michele
x
Hi Chris,thank you for the photo tutorial...very well explained,must try some of your tips,your photo's are always spot on,
Take care
Sandra x
Great tips...isn't it amazing the difference the lighting makes?!
hugs, Jami
Chris - that's spooky 'cos that's almost the same camera as mine which is also a Samsung L83T, and I use those same two buttons although I tend to swap back and forth between flash etc AND I still can't always get good photos - it does my head in sometimes - today I was nearly the whole morning trying to get a half decent photo of my green and white one.I'm thinking about getting a photo tent as the light is so bad sometimes in my flat - Grr!
What do you reckon...
Hugs
Dawn
Oh Chris.,.. this is soooooo helpful. I need all the tips I can get when it comes to photography!
Hugs
Sandra xx
New to your blog,enjoyed reading this post and taking in all the tips. I struggle alot with photos and generally fighting with my camera to take a good shot. Lovely stuff.
Chris i loved reading this.
i have the same problem with my picture taking!!
sometimes i just does not work
i will try the 2 differen light soucres to get the sparkle. i did not know about that
I'm going to come back to this and study it cause your photos always look excellent.Thanks
Louby x
Thanks for the photography tips. I could sure use them. I have a $800.00 camera, and STILL can't take good pics. I think I need photoshop!
thanks for your help great hints and tips I am terrible at photos so will give it a try
thanks
jackie
Post a Comment