Showing posts with label 3d creations. Show all posts

7 July 2011

Craft Barn Product of the Week - Katzelkraft Stamps


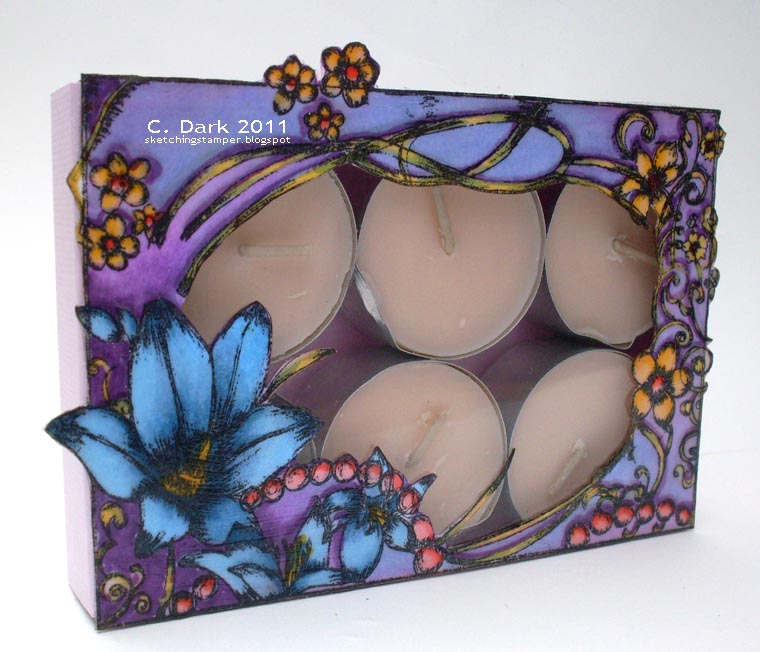
Hi everyone! Product of the week at the Craft Barn Blog this week is Katzelkrft Stamps and I've made a gift box for tea light candles with the beautiful Katzelkraft frame stamp which forms the top of the box made from bazzil card. 

The frame was stamped with Memento ink,coloured with copic markers and then I cut out the middle to give the aperature. To protect the colouring I painted on some gloss multi medium which gives it a nice sheen and then I glued the frame to a piece of acetate cut to the same dimensions. I made up the end opening style box and cut away the inside of the top to leave just a a small amount of card to attach the frame.

I hope you'll pop over to the blog and have a look at all the gorgeous projects from my DT friends this week and today a wonderful project from Michelle as well as my gift box with more to come tomorrow and Saturday.


Enjoy your day!

1 July 2011


Hi everyone! This week at the Craft Barn Blog we've been showcasing the lovely Tando Creative chipboard line with some superb creations and ideas from my DT friends. My project featured today incorporates some gorgeous Tando bunting, balloons and butterflies and I've used them to decorate a set of three paper mache crown boxes inside and out. I hope you'll pop over to the blog where there are lots of photographs to show all the boxes individually plus the insides of  those I haven't shown here. 

Thanks as always for your lovely comments, they're very much appreciated :)

Materials:
Tando Butterflies, Balloons, Straight banner
Set of three crown paper mache boxes
Fresco Finish Chalk Paints - Honey Dew, Lilac, Ice Blue
Katzelkraft Stamp Chapitre
Sizzix Alterations Movers and Shapers Dies: Mini Branch, Mini Butterflies, Mini Cage and Bird
Tim Holtz Ideaology Tissue Tape: Nostalgic
Craft Creations paper - yellow stripe, blue stripe, green stripe
Viva Decor pearl pen - blue
self adehesive gems
craft barn white card Punches: mini flower, mini butterfly
Inksentials white pen, black fine liner pen
Ranger Blending tool
Ranger Distress Ink: Walnut Stain, Stormy Sky, Dusty Concord, Aged Mahogany
White Rub'n'Buff
Glossy Accents


17 June 2011

The Craft Barn Wishing Well - Embossing Paste


Hi everyone, hope you've all had a good week. The Craft Barn Wishing Well this week is all about embossing pastes and stencils. Lots of lovely inspiration from my design team friends through the week and today there's an explanation of how I made my project so I hope you'll pop over and have a look at what we've all been doing :D.

Materials: Chipboard, Dreamweaver Paste - Glossy White, Distress inks - Broken ChinaChipped SapphireForest MossFired Brick,Scattered StrawSelf Adhesive canvasTando - Butterflies, Tando Mask - Sequin Waste, Brilliance Ink - white, Grunge PaperKatzelkraft Grillage Stamp, Sizzix alterations dies: Mini Butterflies and hardware, self adhesive gemsRanger pearl shimmer spray, White Gessostring, Rub 'n' buff - white, white pen and the end of a round eraser! 

Have a good day!

14 June 2011

Katzelkraft - Notebook


Hi everyone! A notebook that I've made to show today for Katzelkraft using stamps KTZ91, KTZ93, KTZ 94 and KTZ96 and which I'm entering into the Simon Says Stamp and Show Challenge which has a theme of distressed/torn edges this week, hopefully distress means sanding and sponging the edges which I've done on the covers using walnut stain distress ink.

The notebook covers  are chipboard covered with card that I stamped on. The front cover image was coloured with copics and pencils and the title is handwritten. The card for the inside and back covers was inked with distress ink, sprayed with perfect pearls and water, sanded and then  sponged around the edges, then glued to the covers. I've painted the covers with a layer of gloss medium to protect them as I'll be keeping the notebook in my handbag. The book was put together with some printer paper cut to size using my binding machine.

Katzelkraft stamps are available exclusively in the UK at the Craft Barn and from Katzelkraft Stamps in France.

Enjoy your day!


29 March 2011

katzelkraft Transportation


Half UM plate Transportation

Hi everyone, hope you had a good weekend and you're enjoying some nice weather, it's been beautiful here and nice to see some sun for a change.

I have a Katzelkraft project to show today and I've used stamps from the Transportation set which I love and I know I'll be using this a lot for all the male birthdays that I have coming up. 

The plane image is stamped onto three domino size stampbord pieces which I coloured with various distress inks. The stampbord was taped down and butted up against each other before stamping with Archival ink and  I stamped the sentiments over and around the plane without re-inking them each time then scratched in the details and highlights with a scratch tool. The stampbord is mounted on an inked chipboard rectangle and that onto a Sizzix alterations baroque die cut chipboard piece also inked with distress ink. 

Katzelkraft stamps are available in France at Katzelkraft Stamps and in the UK at The Craft Barn.

Enjoy your day. :)

23 March 2011

The Craft Barn - Wishing Well - Viva Decor Products


Hi everyone! It's the start of a new Wishing Well on the Craft Barn Blog starting with my project and step by step today and followed by some wonderful inspiration tomorrow from Kathy and on Friday from Isa together with the new challenge. 

Julie's wish to see some projects with Viva Decor products is being granted, congratulations Julie and I hope you enjoy your prize. I hope you'll join the challenge for this wishing well starting on Friday with another lovely prize to be won.

I've used three Viva Decor products to make my wall hanging which are Terra (Sahara), Precious Metal Paints in Rose Pink, Pistachio and Mother of Pearl. For decoration I used a Viva Decor Pearl Pen in White. I made a grunge paper rose with the Paper Artsy Grunge Flower die set and painted this and the hand cut leaf and punched butterflies with the Precious Metal paints.


Above is how the Terra looks after it's been spread onto the Tim Holtz Alterations Baroque Die cut chipboard, stamped with Katzelkraft stamps from Chandalier  and Cirque 01 sets then left to dry. It looks lovely unpainted in this colour and comes in lots of earth tone colours.

The step by step for this project is on the Craft Barn blog with a full list of the supplies used if you'd like to see how it was done.


I used the beautiful Precious Metal Paints again for the project above which is one of the Craft Barn's Range of alterable ceramic pieces and inspired by Craft Barn tutor Carole's beautiful work with metal. 

Enjoy your day.

24 February 2011

Craft Barn Wishing Well - Kylon and Dominoes part 2


Hi everyone and it's part two of the Craft Barn Wishing Well Krylon and Dominoes wish from Lisa which started yesterday with Isa's fantastic step by step. Today there's another gorgeous step by step which Michelle has made and my sample above on the blog together with the materials we used, hope you'll pop over and have a look and of course you can add your own wish to the wishing well post. More news is that we're going to have guest designers joining us starting in March which is great so if you comment and enter the challenges Isabelle might be asking you if you'd like to be a guest :). 

Enjoy your day. :D

1 February 2011

Katzelkraft - Simon Says Stamp and Show - Gift Box


Hi everyone hope you had a good weekend! My day on the Katzelkraft blog today and I've made a gift box using the new Katzelkraft  'Love' half plate stamps. I've stamped the box after cutting out with three pastel coloured dye inks for an any occasion love gift using the large grunge heart and before folding and gluing the box together. I stamped and cut out an extra heart to make the tag. The rosette is also stamped with the sentiment used on the tag before cutting out and the flower on top is die cut from fabric and inked with mica mist. The box, rosette, tag and rose edges are inked with distress ink.

I'm entering the Simon Says Stamp and Show Challenge this week where there's a love theme.

4 January 2011

Katzelkraft DT - gift box

Hi everyone and best wishes to you all for a very happy new year, I hope your celebrations were good :D! 

It's my day on the Katzelkraft blog today and I've made a little gift box  from kraft card and stamps from the beautiful  Nature plate. After scoring the box and before gluing it together I stamped around each side of the box base and lid and a motif in the centre of the lid and they were all embossed with white embossing powder . I added a bit of colour with a couple of copic markers and then after gluing and allowing to dry I sponged all the edges of the box base and lid with walnut stain distress ink and lightly with white Brilliance ink over the top of the brown. I finished off with a pretty ribbon.
Enjoy your day.

22 December 2010

Craft Barn DT project


Hi everyone just popping on with a few cards and a canvas made the Craft Barn today using some gorgeous Katzelkraft stamps. All the materials used are on the Craft Barn Blog and some gorgeous samples from my team mates too.

19 December 2010

The Craft Barn DT Project - Alterting


Hi everyone and here I am a day late (whoops!) with my Friday DT Altering project for the Craft Barn blog. I thought I had this one scheduled but when I looked today there it was still in drafts :), so apologies to my team mates for that.

Everyone has made gorgeous projects for this post, I hope you can pop over for a look and there's a fantastic altered tin by Isa with a step by step on how she made it.

My bird box materials list is on the blog and briefly, it's painted with Ecogreen acrylic paints and glue to make the crackle paint effect. When it was all dry it was stamped with Katzelkraft stamps from the nature plate using Stazon ink. I decorated pearl pens, stickles, glitter, distress ink and glossy accents. I love the shape of this bird box, I think it's the elongated lines of it and I might have to do another one soon, I really enjoyed it.

Well I hope your Christmas preparations are going OK, we've had several more inches of snow here today in the South East which doesn't help getting around. Stay warm :)

16 December 2010

Magnolia Advent Calendar Blog Hop


Hi everyone and I'm very happy to be hosting window sixteen of the Magnolia Advent Calendar blog hop today. Magnolia are very generously giving away a prize every day in December and all you have to do to be in with a chance of winning is pop over to my Magnolia Blog for more details of what to do.

I decided to make an advent calendar for the blog hop as it's tradition to have one in our house every year. My usual calendar is shown in the photo's below and was made when my boys were small. I cross stitched it, sewed all the aida fabric together and mounted it on board and it usually hangs on a wall.


The new calendar was a KaiserKraft chipboard flat pack that I put together, painted with gesso and then covered all the little boxes with Magnolia papers and there's a small amount of SEI paper too. The numbers were painted with Ranger Picket Fence crackle paint and then attached to the boxes. For my centre panel I used a piece of 8 x 8 inch chipboard (it's a big calendar) also painted with gesso and then I sponged on my background scene. I did the mountains and sky by cutting a curvy shape into a sheet of printer paper and using both sides as masks for the sponging.  The trees were also sponged on using distress inks and then I added lots of glitter, cosmic shimmer glitter jewels and white rub 'n' buff.


Tilda in Christmas coat is painted with distress inks and cut out and the skaters were stamped onto shrink plastic, painted with distress inks and then shrunk down so that I could have them in the distance. I stamped Magnolia Christmas text stamps on a Magnolia Doo Hickey tag that I cut from white Bazzil card then added some rusty tin holly leaves, twine, little bells, a Marianne swirl die cut and some ribbon that I died with mica powder and distress ink and then wrinkled. To decorate the little ledge in front of the panel I glued on some sparkly twigs, mini tinsel and snowballs to finish off the scene.


Camilla added a lovely poem on her hosting day for the blog hop and I'd like to leave you with my favourite winter poem by Robert Frost which came to mind when I was making the panel.

Stopping by woods on a snowy evening : Robert Frost

Whose woods these are I think I know.
His house is in the village, though;
He will not see me stopping here
To watch his woods fill up with snow.

My little horse must think it queer
To stop without a farmhouse near
Between the woods and frozen lake
The darkest evening of the year.

He gives his harness bells a shake
To ask if there is some mistake.
The only other sound's the sweep
Of easy wind and downy flake.

The woods are lovely, dark and deep,
But I have promises to keep,
And miles to go before I sleep,
And miles to go before I sleep.

Thank you for reading to the end, it was a long post :).