Showing posts with label card. Show all posts

29 April 2020

Paperbabe Stamps - Birthday Card


Hi everyone, it seems a while since I've posted here but I hope you're safe and well. Today the Paperbabe team members have a little blog hop going on starting at Terri's blog where you'll find links to all the team members posts. Why are we holding a blog hop today? Well it's Kim's birthday and we thought we'd celebrate and send her some love! Happy Birthday to my lovely and talented friend, this card is on it's way to you, I hope you have a perfect day.

My card is a little bit of Kim and a little bit of me :)! I water coloured the flowers and used Kim's stencil Iso Fun, Flourish and Grow Stamp Set, Just Because and Butterfly Pieridae stamp sets for the rest of the card.


I added distress oxide through the stencil all around and in between my watercolour flowers, and then I started the outlining with black pen.


the panel is finished off with stamping and ink splats.


I added a pink mounting layer and glued to a blue card base to finish off.

I hope you enjoy the hop and as I mentioned all the team links are on the Terri's blog.

Chris x


17 January 2020

Paperbabe Stamps January Release - Flourish and Grow Stamp Set - Alphonse Mucha-resque


Hello again. Today we're showcasing the Flourish and Grow stamp set and such a great set it is too! Perfect for building your own sentiment combinations or for that bold large sentiment that says it all, there are endless possibilities. I've combined it with the Flourishing Hair Stamps and Templates and the Female Face 3/4 View Left Dinky stamp set


Since my teens I've loved the work of Alphonse Mucha, I think, the original designer of illustrative posters and product advertising. 


I was lucky to see his original art in his birthplace, Prague and also a couple of years ago at an exhibition of his work at the Walker Gallery in Liverpool. I can highly recommend the Walker for pre-raphaelite art too. His four seasons series of posters have been the subject of a few stamp sets from various companies over the years. Anyway, I thought of  his artwork when I saw these sets and lots of possibilities for the stamps. This is how I ended up with a long panel card with the hair swirling down, it was easy to join in the separate curl stamps to the main hair stamp as well.


All of the new sets will be on sale in the Paperbabe Stamps shop tomorrow and of course there is some fantastic inspiration from Kim and all my teamies linked at the Paperbabe Stamps Blog.

Back soon,
Chris x

28 August 2019

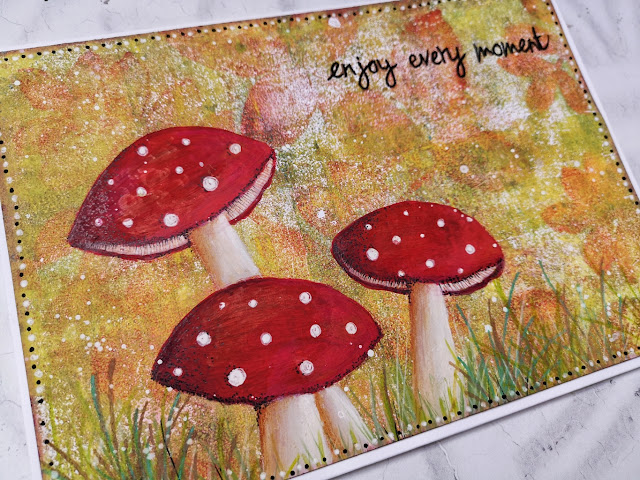
PaperArtsy Blog contribution - Topic 13 Mushrooms


Hi everyone, hope you're well. I have a project on the PaperArtsy Blog currently where we're sharing projects for topic 13 - Mushrooms. 


I made a one layer card.


I did some gel printing as the background layer using a PaperArtsy stencil.


The mushrooms were created using an entirely different stamp, there are more photo's and how I created them on the PA blog.


Back soon,
Chris x


8 August 2019

Paperbabe Stamps August Release - Mini Templates


Hi everyone, there's a new release reveal all this week on the Paperbabe Stamps blog with lots of new goodies to choose from which will be for sale in the Paperbabe Stamps shop on Saturday.


Above you can see the project in full using the new Mini sized versions of the dinky's previously released. It's good to have a template size for every type of project and I've made a large card with the Side Swept Waves, one of the Mini Torso's and the Mini Face stamps from an earlier release.


I started off with a sepia only colour scheme in mind but as you can see it couldn't be much further from that :D. The figure was originally coloured with vintage photo distress ink then I used coloured pencil over the top. There's highlighting with white gel pen and a mixed stencil background. You can see some of the new stencils to be revealed tomorrow here, I used Distress Oxide ink which I knocked back a lot for a muted effect in the background but I used the stars one again on her bodice where it's more prominent and outlined in white pen.

I enjoyed doing her hair and creating waves, highlight and shadow. Close up the black is blacker, the photo didn't pick up on it too well this time.

I hope you'll pop over to the blog to see all the lovely inspiration from Kim and links to the Paperbabe Stamps team.

I'm back tomorrow for the stencils reveal.

Chris x


5 July 2019

Paperbabe Stamps Challenge 97 - Sketch


Hi every one, hope you've had a good week. There's a new challenge starting on the Paperbabe Stamps Blog today and this fortnight the theme is a Sketch which can be interpreted in many ways. s


I made a card with the  Female Face Dinky Stamp SetMixed Media Templates ~ Portrait Face Dinky Set and a Roses Stencil.


Although it's not that obvious I started off with gel plate print which gave me a duotone of pink and blue, the pink at the bottom gave me the background colour for the face.


I used pastels for colouring, distress oxide inks through the stencil and created the bottom diagonal section from the sketch by using a die cut stencil and adding lots of glitter glue on and under it.

Hope you can join us in the challenge, as always there's a lovely prize from Kim.

Have a lovely weekend.

Chris x


14 February 2017

Happy Valentine's Day

Hi everyone and Happy Valentine's Day! I've made a collage style card with 'the kiss' stamp from the Artistic Stamper that I won last week and I love it, it's perfect for Today but other occasions too. Thanks very much Jennie!


I used paper from a very old book for the collages text and also for stamping onto, it was interesting that the paper was very absorbent and sucked in the ink so it appears quite black. I've added zinc white acrylic paint together with red, yellow and blue Fresco Finish paint.


I doodled some hearts, strings and dots with a zig watercolour brush pen and black and white sharpies and added the message top right freehand. There's also some shading with charcoal for a bit of definition. My base is a Ranger extra large Kraft tag, they make great cards when folded in half.

I'm entering my card into the Artistic Stamper February challenge 'Love Hearts'.

Hope you had lots of cards today ;-D

Back soon,

Chris X


13 March 2015

Paperbabe Stamps - Challenge 9

Hi everyone. Today is the start of challenge nine at Paperbabe Stamps and this time we have a colour theme to follow. Hope you can join us.

I've made a card using the Folk Fabrique and Happy Thoughts stamp sets over stamping with various stamps from Folk Fabrique to build up a layered background paper.

I coloured the Artcuts wood embellishments to match the colour scheme using the same Memnto Luxe inks that I used for the background.

The sentiment was stamped in brown ink and outlined with white pen and I added a dotty border, ink spatter, twine and a die cut trellis.
Back soon,
Chris x


4 September 2014

Paperbabe Stamps September Release - large Peony and Bud Stamp set

Hi again everyone and today we're presenting a gorgeous new stamp at Paperbabe stamps which is the Large Peony and Bud cling rubber stamp set.


I've stamped the peony which is a lovely size stamp in versamark ink onto a salt and watercolour background that I die cut with a large card size shaped die. After stamping I heat embossed with black embossing powder. I really like the texture and shine from the embossing and also that the colours of the background still show through.

I also heat embossed the sentiment from MayLeeDee with knit pattern dress in blue embossing powder, added ribbon, a gem and a bit of white rub n buff around the edges to finish.

All of the September releases will be available for purchase tomorrow from the Paperbabe Stamps shop.

Hope you have some creative time today.

Chris x


2 July 2014

Flip-it's card and gift card folder


Hi everyone. I have a flip-it's card and gift card folder to share today made using sizzix dies to cut out my mixed media paper.
Lots of Paper Artsy Fresco Finish chalk paints in opaques and transluscents (Mermaid, Beach Hut, Snowflake, Blood Orange, Very Berry, Inky Pool, Lilac) were added to build up the colours  in several layers and then the stenciling was done with the transluscent shades of the paint. The final layer of stenciling was done with white paint mixed with Paperartsy matte glaze to knock it back a bit and all the colours except blue were used through the Tim Holtz heart stencil.


 I stamped over the card base with various stamps from the Tim Holtz Stampers Anonymous set Bitty Grunge but left the centre extra panel piece free from stamping for contrast apart from the Tim Holtz Hashtag sentiment and the stamping on the heart die cut with a Tim Holtz Movers and Shapers heart die.  All the edges are doodled with dots of white, black and Sakura glaze pen, the glaze pen adding a bit of shine and the heart has also been given a layer of Ranger Distress Rock Candy Crackle paint.
 

The little gift wallet is coloured in the same way but with less colours of paint and less stamping. The sentiment panel has been coloured with the same colours as the card and stamped with another of the hashtag sentiment stamps before doodling and adding the distress crackle paint.

As I've used a stencil for the hearts I'm entering my card and folder into the July Country View Crafts Challenge of 'stencil it'.


23 June 2014

21st Birthday card


 Hi everyone, I hope you had a good weekend and are enjoying a lovely summer so far. 

I'm joining in with the Compendium of Curiosities 3 challenge 5 which this time is Distress Watercolouring Part 1 on page 39 of Tim Holtz's Compendium of Curiosities 3 book. This challenge is sponsored by Inspiration Emporium.

I ended up working through page 39 and 40 to include part one and two using the party hat image from the Birthday Blueprints stamp set.


I added the happy birthday sentiment from the TH hashtags set (great for male cards!) and to add to the collage style I added the 21 birthday numbers and a couple of other sentiments and an arrow from the TH 'life quotes' remnant rubs. The image panel is completed by using the Ranger Spritzer and basically the technique on page 40 of CC2 except with different colours. I also added some brush splatter with watered down distress inks from the markers.To make up the card I layered the panel on dimension tape over paper from a TH paper stack with twine and an ideology metal key.

I gave the card to the recipient at his celebration on Saturday evening and I'm glad to say that he was really pleased with it. As it was a card for a male I'm also entering into the Country View Crafts Challenge 'only men allowed' where hopefully it'll be male enough to fit in with their theme.